|
 |
Photography Tips
|
|
|
|
|
Administrator  Join Date: Mar 2000
Location: Land of the Easily Amused
Status:
Offline
|
|
posted this elsewhere, but it seemed about time we had a thread addressing this.
post some tips/tricks you've picked up over the years about photography. the more knowledge the merrier.
---------------------
i'll start off with more of a lesson than a tip. but you have to start somewhere. and a lot of the tutorials on this subject use crappy examples.
Depth of Field & Apertures
The aperture on your camera is a measurement of how open the iris of the lens is. This determines not only how much light is let in, but what kind of depth of field you get for a particular picture. Here's a stolen/changed graphic for you visual learners:

You'll notice that even though 2.8 is a smaller number, the opening is much larger than 16. This is because the number is actually the denominator of a fraction. So ƒ1.8 is fairly large (as is the opening, letting in a great deal of light) while ƒ22 is pretty small (letting in very little light). A lens capable of shooting at ƒ2.8 or above (up to ƒ1.0) is considered fast. The convenience of a fast lens is that you can shoot in lower light situations without resorting to using the flash or changing the ISO (more on that later). You can also shoot at a faster shutter speed, as blurring can occur when it gets too slow.
The focus right now, however, is depth of field. A larger aperture (closer to 1) results in a narrower depth of field. A smaller aperture (this can go obscenely high, but ƒ22 is pretty common) results in a longer depth of field. But enough with words, examples!
 ƒ1.8 - 1/8 of a second shutter speed
As you can see, the depth of field is very narrow. As you can probably also see, my focusing wasn't entirely perfect. But hey, it's a free class! 
 ƒ10 - 4 second shutter speed
The depth of field is noticeably wider. All of the books are now pretty much in focus. You can now also see that those blurs in the background are actually more books.
 ƒ22 - 20 second shutter speed
You can now make out details of the books in the background while little imperfections in the foreground books are suddenly apparent.
All of these were shot using a tripod, as steadily hand holding a 20 second exposure is impossible. I didn't change the focus from shot to shot. The only thing that changed were aperture and shutter speed.
Your focus distance is a very important factor in this depth of field discussion. If the object is very close, as these foreground books were to my camera, then you have a narrow stretch of space that will be in focus at an aperture of ƒ1.8.
"Isn't that the point?"
Well of course it is, but hear me out. If the object is further away, your focusing error padding is considerably greater. Examples!
 ƒ1.8 - 1/60 of a second shutter speed
The PG sign is much further from the camera than the books were. The amount of space that is in focus, you can see, is also several inches wide. The PG sign and about 1/3 of that side of the shelf are in pretty good focus. The book shot, in contrast, had good focus in an area that could be measured in millimeters.
 ƒ22 - 2.5 second shutter speed
Just to show you the rest of it.
So use the Aperture Priority mode on your camera sometime and play around with the results. You'll need a tripod if you're indoors. Or at least a flat surface to rest the camera on. Aperture priority, btw, means that you choose the desired aperture and the camera selects the appropriate shutter speed for a proper exposure. If this is slower than 1/60th of a second (it depends on the camera and lens used), then you'll want to use a tripod, a flash, a wider aperture, or change the ISO on your camera (I'll save that for another time). Ignore those numbers if your lens/camera has image stabilization. But if it does, you probably didn't need to read this whole thing.
|
|
|
| |
|
|
|
|
|
|
|
Junior Member
Join Date: Jun 2006
Status:
Offline
|
|
Oh my god thank you so much. I had no idea aperture was so important. I just changed it for landscape/non-landscape shots.
|
|
|
| |
|
|
|
|
|
|
|
Mac Elite
Join Date: Oct 2000
Status:
Offline
|
|
Shutter speed and aperture are a inversely proportional. So if you make the aperture twice as large (f/4 to f/2) then the appropriate shutter speed can be cut in half (1/30 to 1/60, say). So an increase of one, results in a decrease in the other. If you use one of your priority modes, this will be done automatically, but it's good to be able to predict what a certain adjustment will do.
And here's a tip from someone who's read a lot about photography and didn't realize... Generally, you'll find that for most pictures you'll want your aperture at full open (f/2, f/1.8, f/1.4 or whatever it is). This allows you to bokeh your subject, which is illustrated in dh's examples. Essentially, your subject is in focus and everything else isn't. Full open is also good because, as it lets more light in, you can shoot at higher shutter speeds, which is essential if you're handholding. Now, the lesson comes when you're shooting outdoors, generally in bright sunlight...
If you set a particular aperture, and then hold the shutter down halfway, your camera should tell you, somewhere, what the appropriate shutter speed is. Sometimes, if simply too much is being let in, with the lens at full-wide (in my case, f/1.8), then the camera cannot shoot fast enough. E.g., at f/1.8, and 1/4000 of a second, the scene is still too bright, and will be overexposed. How do you know when this happens? If the camera if chooses your highest shutter speed, that's usually a good indication. But mine (you'll have to see what yours does) will flash the shutter speed if it can't obtain a good exposure. The solution? Switch to shutter priority mode. Choose something slower than the maximum speed (as this results in an overexposure) and something faster than 1/60, for good handholding. A good thing to do is to hold the shutter half way, pointing at your scene each time you make a shutter speed adjustment. See what the camera determines to be the appropriate aperture. It may still be too fast to properly expose. Once you go slow enough that it reaches the wide open aperture (and, incidentally, this may be faster than 1/60), then you know your limit. Find an aperture middle ground between that, keeping in mind that the final aperture will affect the depth of field, as dh explained.
It may be obvious, but it results in better exposed pictures in bright light. I'll post examples later.
Edit:
Two overexposured shots, with two wide an aperture. Notice that the sky in both almost completely white and how the highlights on the shirts are far too bright.


Now, I appropriately changed the shutter speed, allowing less light in, as not to overblow the highlights. The skies are now a lot more blue. Another effect of slowing down the aperture is that the subject gets a bit darker, in these cases, not dark enough to be too underexposed, but it's still there. It's something to keep in mind, but it's better than completely losing information because an image is overexposed.


Another tip is to look up exposure compensation in your manual. In general, it's a good idea to shoot 2/3, 1/2 or a full stop lower. Your images will be darker, but it'll allow you to use a faster shutter speed (which is useful in darker situations) and, in general, it's easier to save images that are slightly underexposed than overexposed. The saturation and color richness of objects can also be enhanced by shooting a slightly darker exposure.
(
Last edited by Synotic; Jul 27, 2006 at 01:56 PM.
)
|
|
|
| |
|
|
|
|
|
|
|
Fresh-Faced Recruit
Join Date: Jun 2006
Location: Georgia
Status:
Offline
|
|
Aperture - Most lenses contain a diaphragm, a thin light-blocking plate or interleaving set of adjustable plates. The diaphragm contains a small hole, the aperture, which is adjustable in size and allows the photographer to control the amount of light entering the camera. Apertures are indicated by the f stop value, which is a relative value and does not indicate the actual size of the aperture hole.
WIDE APERTURE:

50mm @ f/1.4
MID APERTURE:

50mm @ f/8
SMALL APERTURE:

50mm @ f/16
The higher the value of the stop (f/16, f/22), the smaller the hole through which light passes, the clearer the overall image is.
The lower the value of the stop (f/2.8, f/1.4), the wider the hole is, the shallower the depth of field (defined later.)
-------------------------------------------------------------
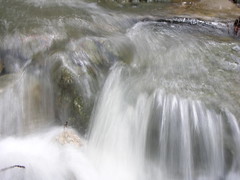
Shutter Speed - The precisely-calibrated amount of time that a camera shutter stays open, usually measured in fractions of a second.
The shutter speed and the lens aperture are the principal forms of control that a photographer has over the amount of light which hits the film or image sensor of a camera. To be more accurate, this should really be known as “shutter time,” but “shutter speed” is the traditional name.
QUICK SHUTTER

32mm @ 1/1000 sec (f/5.6)
MID SHUTTER
80mm @ 1/64 sec (f/5.6)
SLOW SHUTTER

28mm @ 2" (2 seconds) (f/2.8)
Quick shutter speed allows for capturing motion in a still shot, and slow shutter speed allows for motion to be captured.
-------------------------------------------------------------
Aperture Priority Mode - Also “aperture preferred system.” A programmed automatic exposure setting on most automated SLRs. In this mode the photographer specifies the desired aperture and the camera automatically sets an appropriate shutter speed based on information from its internal light meter.
Canon, Pentax and Contax abbreviate aperture priority as “Av” for “aperture value.” Nikon and Minolta abbreviate it as simply “A.”
Shutter Speed Priority Mode - Also “shutter preferred system.” A programmed automatic exposure setting on most automated SLRs. In this mode the photographer specifies the desired shutter speed and the camera automatically sets an appropriate lens aperture based on information from its internal light meter.
Confusingly, Canon, Pentax and Contax abbreviate shutter priority as “Tv” for “time value.” Nikon and Minolta abbreviate it as simply “S.”
-------------------------------------------------------------
Depth of Field - (DOF).
Very simply the distance range of acceptable focus in front of your lens.
When you focus your camera on a given point there is a range in front of the point and behind that point which is also in acceptable focus. If this range is very narrow then you have very shallow depth of field - only the plane at the focus point will be in focus and everything else will be blurry. If you have deep depth of field then much more of the image will be in acceptable focus.
Examples:
Shallow DOF
Deep DOF
Depth of field is determined by a number of factors. The three key factors governing depth of field on a given camera are the aperture and focal length of the lens and the subject distance.
Aperture.
The larger the aperture (smaller the f stop number) then the smaller the depth of field and vice versa. Pinhole cameras, which have tiny holes rather than lenses, have a near infinite deep depth of field.
Focal length.
Lenses with short focal lengths (wide angle lenses) have wider depths of field available and lenses with long focal lengths (telephoto lenses) have shallower depths of field available. This is generally a good thing. If you’re using a really wide lens for landscape shots you’ll be able to get huge areas of scene in sharp focus. But if you’re using a really long telephoto lens for bird photography then your depth of field will be really shallow and you’ll be able to isolate the bird in the landscape nicely.

Short focal length - wider DOF (more in focus)
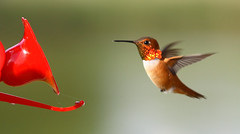
Long focal length - shallower DOF (less in focus)
Subject distance.
Finally, the distance from the lens to the subject also affects depth of field. If you’re really close to your subject, such as with macro photography, then depth of field will be shallow. But if you’re taking a photo of something that’s a long way away then your depth of field will be deeper.
One other point is that the size of a camera’s image area also dictates the depth of field. A camera with a large image area - say a medium-format or large-format camera - is capable of a much more shallow depth of field than a camera with a smaller image area. This is why consumer digital cameras, which have tiny image sensors, have such deep depth of field.
It should also be noted that this is a very non-technical description of what depth of field is all about. To be more accurate you need to go into a lot of math and consider the definition of the circle of confusion and the print size and so on. But the simplified aspects above are adequate to get a grasp of how to control depth of field adequately to make your photos look the way you want them to.
Depth of field is sometimes called depth of focus, but that is not correct. Depth of focus would be the tiny range of acceptable focus behind the lens at the focal plane itself.
Definitions from PhotoNotes.org
|
|
|
| |
|
|
|
|
|
|
|
Mac Elite
Join Date: Jun 2004
Location: Nashville
Status:
Offline
|
|
Digital SLR Tip:
When shopping for a digital SLR camera, do not shop based on mega pixels alone. You should consider the size of the image sensor with just as much importance (bigger image sensors produce the clearest pictures).
|
|
|
| |
|
|
|
|
|
|
|
Administrator Join Date: Mar 2000
Location: Land of the Easily Amused
Status:
Offline
|
|
|
|
|
|
| |
|
|
|
|
|
|
|
Fresh-Faced Recruit
Join Date: Jun 2006
Location: Georgia
Status:
Offline
|
|
Very nice reply demonhood...
If I were told to delete my pictures, I'd simply and quickly unlatch the CF card lid on the side of my 350D and slightly press on the card so it disconnects. Then, when obviously having no internal storage, I wouldn't have a problem showing whomever that there are no pictures stored.
|
|
|
| |
|
|
|
|
|
|
|
Mac Elite
Join Date: Oct 1999
Location: Moved from Ohio's first capital to its current capital
Status:
Offline
|
|
Avoiding camera shake/blur in your pictures:
The slower the shutter speed on your camera, the more likely your image may be blurred because of camera movement.
If you're using an SLR camera, the general rule of thumb is not to hand-hold the camera with a shutter speed set lower than the focal length of your lens. For example, if you have a 200mm lens, you shouldn't set the shutter slower than 1/200; for a 20mm lens, no slower than 1/20, etc.
Of course if you have really steady hands, this rule can be bent/broken. I've taken photos with my 200mm and a shutter speed of 1/30.
Hints for stability if you have to bend/break the rule:
• exhale just before taking the picture.
• stabilize the camera/lens against something immobile, like a door frame or the back of a chair.
• shoot lots of pictures. As the lens moves, there is a "peak action" when it stops floating one direction and moves the other direction. At that moment, you'll have a better chance of minimizing camera shake.
You may also want to consider purchasing a monopod. A monopod is basically a tripod with only one leg. You could also purchase a tripod, but my experience is that a monopod is much more useful and easier to move around with. I own both a monopod and tripod. I use the monopod on assignments an average of every other day. The tripod I've probably used maybe a dozen times in the ten years I've owned. Not to minimize the importance of a good tripod though...there is no substitute for a good tripod because when you need one, you really need one. No trick or monopod will substitute.
|
|
|
| |
|
|
|
|
|
|
|
Banned
Join Date: Jun 2005
Location: Indy.
Status:
Offline
|
|
Originally Posted by chrismccorkle 
Very nice reply demonhood...
If I were told to delete my pictures, I'd simply and quickly unlatch the CF card lid on the side of my 350D and slightly press on the card so it disconnects. Then, when obviously having no internal storage, I wouldn't have a problem showing whomever that there are no pictures stored.
Unfortunately this doesn't work on my Canon XTi. The card door pushes the card back unto the connectors.
|
|
|
| |
|
|
|
|
|
|
|
Posting Junkie
Join Date: May 2001
Location: Brisbane, Australia
Status:
Offline
|
|
I don't know how the 350D works, but my cameras show a "no memory card" graphic that wouldn't really fool anyone but the daftest.
|
|
|
| |
|
|
|
|
|
|
|
Mac Enthusiast
Join Date: Jun 2006
Location: New Windsor, NY
Status:
Offline
|
|
Originally Posted by - - e r i k - -
I don't know how the 350D works, but my cameras show a "no memory card" graphic that wouldn't really fool anyone but the daftest.
my 300D has a "No CF Card" option that lets me shoot without a CF card and displays no message, so it would work for me, plus it lets me shoot directly to the computer with the right hook up
|
|
|
| |
|
|
|
|
|
|
|
Mac Elite
Join Date: Nov 2006
Location: here
Status:
Offline
|
|
Photography resources:
luminous-landscape.com (forum and articles about photography, e.g. screen calibration tools, the art of correct exposure with a digital SLR versus analog film, especially when compared to slide film, etc...)
dpreview.com
dcresource.com for camera reviews
|
|
|
| |
|
|
|
|
|
|
|
Junior Member
Join Date: Mar 2007
Status:
Offline
|
|
For beginners like me, the ability to get the right exposures under certain conditions is a must if he has an inclination of mastering photography. Once he has done it, next thing to know is to study the art of composition.
These are the two most important aspects that could make everyone a good photographer.
It's just my opinion.
|
|
|
| |
|
|
|
|
|
|
|
Mac Elite
Join Date: Nov 2006
Location: here
Status:
Offline
|
|
|
|
|
|
| |
|
|
|
|
|
|
|
Fresh-Faced Recruit
Join Date: Sep 2007
Location: Australia
Status:
Offline
|
|
Sorry if this is an older topic, but thank you. Finally a guide in plain English that's easy to understand
|
|
|
| |
|
|
|
|
|
|
|
Fresh-Faced Recruit
Join Date: Jun 2007
Location: Seattle, WA
Status:
Offline
|
|
Thanks for all the good info!!! I have a Canon Powershot S3 IS. I bought it for Image Stabilization but my pictures still come out shaky. I thought this was automatic. I must be missing something.
|
|
|
| |
|
|
|
|
|
|
|
Professional Poster
Join Date: Mar 2003
Location: Down by the river
Status:
Offline
|
|
Originally Posted by cbrfanatic
my 300D has a "No CF Card" option that lets me shoot without a CF card and displays no message, so it would work for me, plus it lets me shoot directly to the computer with the right hook up
Why would anyone in security believe you were shooting without a memory card installed? If they saw you taking photos they have to assume you removed your memory card.
|
|
|
| |
|
|
|
|
|
|
|
Mac Elite
Join Date: Aug 2006
Location: London
Status:
Offline
|
|
Nice write up... Also remember that aperture also can effect the actual sharpness of an image. Most lenses are soft wide open (smallest F number) but image quality improves when stopped down a little!!!
|
|
MacBook Pro 2.2 i7 | 4GB | 128GB SSD ~ 500GB+2TB Externals ~ iPhone 4 32GB
Canon 5DII | EF 24-105mm IS USM | EF 100-400mm L IS USM | 50mm 1.8mkII
iMac | Mac Mini | 42" Panasonic LED HDTV | PS3
|
| |
|
|
|
|
|
|
|
Professional Poster
Join Date: Oct 2004
Status:
Offline
|
|
When you set a camera down (or lens, or strobe, or meter) for what ever reason, always put it on the floor... not a table, or shelf, or chair. It's amazing how well gravity works.
|
__________________________________________________
My stupid iPhone game: Nesen Probe, it's rather old, annoying and pointless, but it's free.
Was free. Now it's gone. Never to be seen again.
Off to join its brother and sister apps that could not
keep up with the ever updating iOS. RIP Nesen Probe.
|
| |
|
|
|
|
|
|
|
Fresh-Faced Recruit
Join Date: Mar 2003
Status:
Offline
|
|
Originally Posted by Synotic
Shutter speed and aperture are a inversely proportional. So if you make the aperture twice as large (f/4 to f/2) then the appropriate shutter speed can be cut in half (1/30 to 1/60, say). So an increase of one, results in a decrease in the other. If you use one of your priority modes, this will be done automatically, but it's good to be able to predict what a certain adjustment will do.
And here's a tip from someone who's read a lot about photography and didn't realize... Generally, you'll find that for most pictures you'll want your aperture at full open (f/2, f/1.8, f/1.4 or whatever it is). This allows you to bokeh your subject, which is illustrated in dh's examples. Essentially, your subject is in focus and everything else isn't. Full open is also good because, as it lets more light in, you can shoot at higher shutter speeds, which is essential if you're handholding. Now, the lesson comes when you're shooting outdoors, generally in bright sunlight...
If you set a particular aperture, and then hold the shutter down halfway, your camera should tell you, somewhere, what the appropriate shutter speed is. Sometimes, if simply too much is being let in, with the lens at full-wide (in my case, f/1.8), then the camera cannot shoot fast enough. E.g., at f/1.8, and 1/4000 of a second, the scene is still too bright, and will be overexposed. How do you know when this happens? If the camera if chooses your highest shutter speed, that's usually a good indication. But mine (you'll have to see what yours does) will flash the shutter speed if it can't obtain a good exposure. The solution? Switch to shutter priority mode. Choose something slower than the maximum speed (as this results in an overexposure) and something faster than 1/60, for good handholding. A good thing to do is to hold the shutter half way, pointing at your scene each time you make a shutter speed adjustment. See what the camera determines to be the appropriate aperture. It may still be too fast to properly expose. Once you go slow enough that it reaches the wide open aperture (and, incidentally, this may be faster than 1/60), then you know your limit. Find an aperture middle ground between that, keeping in mind that the final aperture will affect the depth of field, as dh explained.
It may be obvious, but it results in better exposed pictures in bright light. I'll post examples later.
Edit:
Two overexposured shots, with two wide an aperture. Notice that the sky in both almost completely white and how the highlights on the shirts are far too bright.
Now, I appropriately changed the shutter speed, allowing less light in, as not to overblow the highlights. The skies are now a lot more blue. Another effect of slowing down the aperture is that the subject gets a bit darker, in these cases, not dark enough to be too underexposed, but it's still there. It's something to keep in mind, but it's better than completely losing information because an image is overexposed.
Another tip is to look up exposure compensation in your manual. In general, it's a good idea to shoot 2/3, 1/2 or a full stop lower. Your images will be darker, but it'll allow you to use a faster shutter speed (which is useful in darker situations) and, in general, it's easier to save images that are slightly underexposed than overexposed. The saturation and color richness of objects can also be enhanced by shooting a slightly darker exposure.
the idea here is correct, but the actual relationship between shutter speed and aperture is the number of full f-stops - the aperture numbers are not linear. In your example (Going from f4 to f2) - that is two full f-stops, not 1, so you are letting in 4 times the amount of light, not 2. So the shutter speed would drop from 1/30 to 1/120 (mathematically) - most cameras would adjust it to 1/125.
|
|
|
| |
|
|
|
|
|
|
|
Banned
Join Date: Jun 2005
Location: Indy.
Status:
Offline
|
|
Not the best example, but...
How to keep the sky from being washed out in your pictures: [these shots were actually taken after the sun had set, so I had to use a high ISO which caused a lot of noise]
Metering from the landscape causes the sky to be washed out in this picture

Metering from the sky helps, but causes the ground to be underexposed

Same picture as the one metered from the sky, but with levels boosted for the darker areas and blue enhanced
[with a lower ISO the noise wouldn't be a problem as it is here]

This shot was taken with a polarizing filter. No other adjustments were made, but boosting the darker areas would have less noise that the picture right above and the sky colors are more accurate.

|
|
|
| |
|
|
|
|
|
|
|
Banned
Join Date: Jun 2005
Location: Indy.
Status:
Offline
|
|
Newer pictures with the sun actually shining: Not a single thing was done to these pictures other than to convert from RAW [240-dpi] to jpg [reduced size 50%-quality 72-dpi]
Overexposed, metered the ground

Properly exposed, metered the sky and slightly increased the exposure in-camera to balance between the sky and the ground

Underexposed, very blue sky

Properly exposed with overuse of the polarizing filter

|
|
|
| |
|
|
|
|
|
|
|
Banned
Join Date: Jun 2005
Location: Indy.
Status:
Offline
|
|
The top three pictures did not use the polarizing filter.
|
|
|
| |
|
|
|
|
|
|
|
Fresh-Faced Recruit
Join Date: Dec 2016
Location: Canada
Status:
Offline
|
|
Thanks a lot for the tips. It will definitely help a lot.
|
|
It is time to embrace mental health and substance use/abuse as illnesses.
Addiction is a disease!!
|
| |
|
|
|
|
|
|
|
Fresh-Faced Recruit
Join Date: Feb 2018
Location: USA
Status:
Offline
|
|
Thanks for the information 
|
|
|
| |
|
|
|
|
|
|
|
Fresh-Faced Recruit
Join Date: Aug 2018
Status:
Offline
|
|
Awesome photography insights.
|
|
|
| |
|
|
|
|
|
|
|
Clinically Insane
Join Date: Jun 2001
Location: planning a comeback !
Status:
Offline
|
|
F$&@, I miss Railroader.
And so many others. It’s a shame.
-t
|
|
|
| |
|
|
|
|
|
|
|
|
|
|
|
|
 
|
|
|
Forum Rules
|
|
|
|
You may not post new threads
You may not post replies
You may not post attachments
You may not edit your posts
|
HTML code is Off
|
|
|
|
|
|
|
|
|
|
|
|