|
 |
Need some words of advice from MB who have done surgery on their MB's
|
|
|
|
|
Forum Regular
Join Date: Feb 2008
Location: Chicagoland area
Status:
Offline
|
|
I discovered the other day when I tried to upgrade my OSX to 10.5 that my DVD drive doesn't work. My MB is 1.5 years old and I don't have Apple Care on it. I know it will be $325 to have it serviced and then they will only replace the drive with the factory original.
For $100 I can get an 8x DVD burner SuperDrive and put it in myself. I've reviewed a disassembly manual which shows in detail what needs to be done and to be honest, I'm a little concerned about the process. I'm not the most mechanically inclined person in the world. I have no problem taking my tower apart and swapping components, but this little guy is more complex with tiny parts and crazy clips.
So, has anyone here done such a procedure to their MB? Are there any gotcha's I should be aware of?
Thanks!
|
|
|
| |
|
|
|
|
|
|
|
Mac Enthusiast
Join Date: Nov 2006
Status:
Offline
|
|
Full Auto,
first of all, for anyone wanting to take apart something, I'd say you first have to know your comfort zone. Once you know that, and it seems like you do, you always want to push yourself just outside of your comfort zone to learn something new. However, I'd also say, your goal is to get the drive in and working, and have your mac work like it should be working. That being said, taking apart a Macbook, while others may say it's easy, it may not be to you or someone else. So you'll have to judge for yourself just what you're comfortable doing and what you're not comfortable with doing. Personally I learned to repair laptops by taking them apart and putting them back together again.
You have another option here. Most cities have someone, a repair shop or tech, who can replace the drive for you. I don't know what people charge in your area, but I charge $50 hr to do something like that. Try looking for computer techs who work on Apple computers. You're likely to find one or two shops in your area who do. Some folks might say try craigslist, I say I'd make sure they're a reputable company before doing that. Aside from that, you can also use the guides on ifixit.com.
Honestly all you need is a good set of screwdrivers and some courage. Good luck and keep us posted.
Bishop
|
|
Backups are like guns and condoms. It's better to have it and not need it than to need it and not have it.
|
| |
|
|
|
|
|
|
|
Forum Regular
Join Date: Feb 2008
Location: Chicagoland area
Status:
Offline
|
|
Thanks Bishop.
I'm a fairly technical person having been around PC's most of my life. I've never taken a laptop apart though. I know enough to ground myself, keep my screws organized, even take pictures of components before taking them apart so you know how they should go back together, etc. I do have a good set of tools. My primary concern is getting in there and having to separate two parts that require some special glue/bond to put them back together... or something like that.
Also, the clips that hold the top over on seem a little different. I know how to disengage them (credit card slipped under the edge) but I'm not sure how to reengage them. Do you set them in the closed position and snap the top back in place?
Anyway, everything you said makes perfect sense. In the end I'll wind up giving it a shot. The worst case scenario is that I can't get it back together and I have to take it to a repair shop or to my local Apple store and pay a premium to fix it. 
I'm stoked at the thought of having a superdrive in my little MacBook though!
|
|
|
| |
|
|
|
|
|
|
|
Fresh-Faced Recruit
Join Date: Oct 2006
Location: Maryland
Status:
Offline
|
|
Keep the disassembly guide close, use the correct screw drivers and you should be ok. Take your time and if needed document the steps you have taken. I recently took apart my MB to fix an annoying bump under the palm rest. I took my time and referred to the disassembly guide every step of the way. I was able to fix the bump and got to know my MB a little better. But if you really don't feel comfortable, find someone who is!
|
|
Macbook CD 2GHz/2GB RAM/500GB HD/10.6.2
Mac Mini C2D 2.26Ghz/2GB RAM/160 HD/10.6.2
iPhone 3g 8GB / Apple TV 40GB
|
| |
|
|
|
|
|
|
|
Mac Elite
Join Date: Apr 2000
Location: Los Angeles, CA
Status:
Offline
|
|
Like you, I had the same nerve-wracking tension with my first portable, an iBook G4. I had to replace its hard drive (spilled gunk in there). The first time around can be daunting. It is hard, but by no means impossible. Some recommendations:
1. Be organized. Have a print-out of the disassembly guide in front of you. When removing screws, group them by type, then by stage. That is, keep the screws in the outermost chassis together, but separate from the ones inside. It may be convenient to put them in little bins/containers with labels (e.g. Step 1- Chassis, Step 2 - Metal Shielding, etc). This way, when you reverse the process to assemble things, you'll have access to everything in a neat and organized manner.
A common blunder a lot of people make (myself included) is that I end up with "extra pieces" when the whole thing is reassembled. Being methodic and orderly avoids this mishap.
2. Don't apply excessive force. Especially true for stubborn screws -- you don't want to ruin the heads and make them unremovable. For situations involving you to pry open sealed items, use flatter and wider tips when possible (so the force is distributed evenly).
3. Take your time. When in doubt, review the instructions again. Take special care when reassembling things, such as reconnecting wires. Watch out for cables involving the trackpad, keyboard, hard drive, and power. Nothing's more annoying than having to tear down the unit to reconnect a loose cable.
There are some laptops that will definitely show signs of having been "opened." The first time I opened my iBook, the thin, metal shielding was bent when I extracted it, and the side clips showed clear signs of attempts to remove them. I got better with PowerBooks then MacBooks, though. Not something I'd do in a whim, but definitely worth doing if it involves prolonged downtime.
If you're worried about damaging it and don't mind spending a bit, you might want to consider TechRestore, and iFixit. I've availed of the former's services and am a happy customer -- fast turn-around, good selection of parts, and reasonable prices.
|
|
|
| |
|
|
|
|
|
|
|
Mac Enthusiast
Join Date: Nov 2006
Status:
Offline
|
|
A few tricks i've learned over the years....
first have a HUGE flat surface to work on... workbench or something.
One thing I love doing with the ifixit guides is that I've got 2 of each page of the manual printed out. One set is in a folder that I can follow along with, the second set is for me to lay out at each step, then tape the screws from that page to the actual page. Use cheap scotch tape. Set it aside and then move on to page 2. Any thing you take out, put it on that page, then take it and put that one aside and move on to the next. I use this process in my shop and had my techs do the same procedure. They loved it. No more extra screws laying around, and it actually helps to speed up the re-assembly.
Keep a small bottle of liquid wrench and a needle near by. I've got a few syringes in my office I use for things like putting liquid wrench on a particuarly stubborn screw. When they're that small, just the tinsyist bit of LW will give you that extra edge. Most techs I know never even think of it, but think of the consequences of stripping those extra small screws. Most likely you'll not need it though.
FUN FACT! Lowes hardware sells these small blue metal screwdrivers made by Kobalt. They're like jewelers tools, you know.. that small set of tips. Anyways, they have not only the basic set that comes with phillips heads and flat heads but also one with torx and star screw heads for really small things like laptop work. Just got the torx one the other day to work with an old Powerbook 520. Great part? like $5. Best screwdriver set ever made. They tail cap rotates for those times you're pressing down and need to turn it, and the heads store inside the tail cap and body of the driver.
Extra light. You'll need it. Keep a flashlight handy.
There's nothing there that's glued together. They might have dropped on a drop of hot glue on the ribbon cable somewhere to attach it to the board. If so, take a really good, thin knife and hold it to a flame for 10 seconds. Promptly slice the hot glue away.
Have a pair of surgical foreceps ( think REALLY long needle nose pliers with a curve at the end to tilt down. My techs get these as well. I'm a big believer in what works. When you need to put that screw back, and drop it into a place where your fingers don't fit? Yeah... it comes in REAL handy when you hit that particular snag. Foresepts can be found at any hobby shop or med supply store and even some pharmacies. Get the kind that lock into place if you can. And pick up 2 pairs. You'd be amazed at how well you can pry up cables and such with a set of those.
Do this on a saturday when you've got LOTS of time alone and you can work start to finish. Also try and work somewhere where there's no wind at all. Even a slight breeze can blow away those tiny screws.
I think you're set. If you're looking for more just let me know. But off the top of my head I'd just grab the 2 sets of printouts, lay one out, keep the other one stapled and get some tape, the drivers, and you're off and running. If you DO run into a finger snag where you find your fingers are too big then go ahead and get the clamps. Otherwise I think you're set. I'm just trying to throw in more than you'll need so you don't have to worry about it when you're 27 screws into and start wondering if it will ever end!
|
|
Backups are like guns and condoms. It's better to have it and not need it than to need it and not have it.
|
| |
|
|
|
|
|
|
|
Dedicated MacNNer
Join Date: Mar 2005
Status:
Offline
|
|
guys...
dont forget to electrically ground yourself!! you can damage a whole bunch of stuff if you discharge some static onto your ram or your logic board.
get a wire wristband that is attached to a metal frame of your table or to something that is grounded.
|
|
|
| |
|
|
|
|
|
|
|
Addicted to MacNN
Join Date: Oct 2001
Location: BFE
Status:
Offline
|
|
Check out iFixit.com for take-apart guides and XLR8yourmac.com for a database of compatible optical drives and you'll be OK.
|

I'm a bird. I am the 1% (of pets).
|
| |
|
|
|
|
|
|
|
Forum Regular
Join Date: Feb 2008
Location: Chicagoland area
Status:
Offline
|
|
Alright, thanks a bunch guys. I've ordered my new SuperDrive from Powerbookmedic.com and I've downloaded their PDF guide along with a bookmark to ifixit's online manual. I also ordered a tool set just for taking the Macbook completely apart from Powerbookmedic. I have everything, but I'll keep these with the computer just in case, it was only $14.
I hope to conduct my surgery this coming weekend. I should have the parts next Tuesday. I'll keep everyone posted.
|
|
|
| |
|
|
|
|
|
|
|
Professional Poster
Join Date: Dec 2000
Location: Staffs, UK
Status:
Offline
|
|
While you're in there, I recommend installing the 802.11n Airport card from FastMac. I did it this week, and the difference (in terms of range and speed) is night and day. Best upgrade yet
|
|
|
| |
|
|
|
|
|
|
|
Dedicated MacNNer
Join Date: Nov 2001
Status:
Offline
|
|
Great advice above... What I can add is:
Use a quality set of drivers and torx drivers. Get a black stick tool, it is invaluable.
In battery bay, the three screws taken off right before you can remove the keyboard with top case are the most delicate and challenging screws in the entire machine. When you re-assemble your machine, to avoid your keyboard wobbling make certain you press down on the keyboard while tightening those screws.
Always work in a clean, well lit, static-free environment. Use an ice cube tray to organize screws while you work. Laptops, and most Macs for that matter, are in a different repair skill echelon. This is because most of the parts are custom fit and proprietary.
If you're not comfortable with your skill level, its better to purchase a $79 external optical drive than to total your $1100 machine.
|
|
|
| |
|
|
|
|
|
|
|
Forum Regular
Join Date: Feb 2008
Location: Chicagoland area
Status:
Offline
|
|
Ok, GREAT news! The surgery was a great success and I now have a SuperDrive in my MacBook. I am now able to upgrade my HD from 60gig to 250gig. Before my drive stopped reading DVD's so I couldn't install my OS on a new HD. I'm now in the process of installing 10.5 on my new 250gig HD as I type this.
Thanks for all the advice, I used much of it including the great idea of taping the screws to the instructions. It was really quite an easy process. Here are some pics:
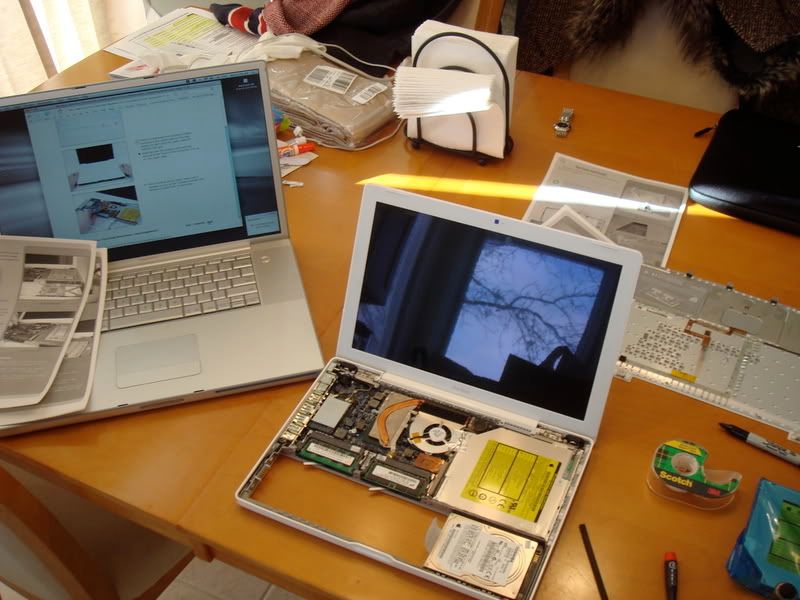
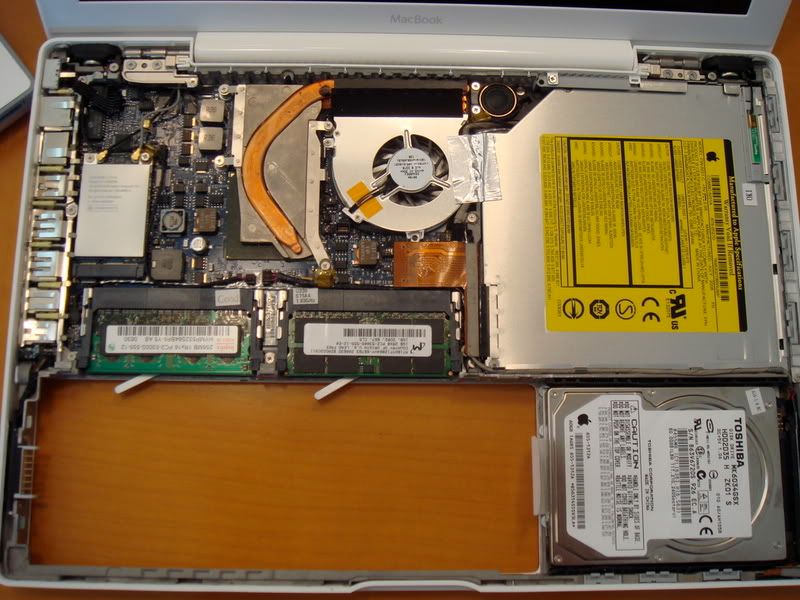
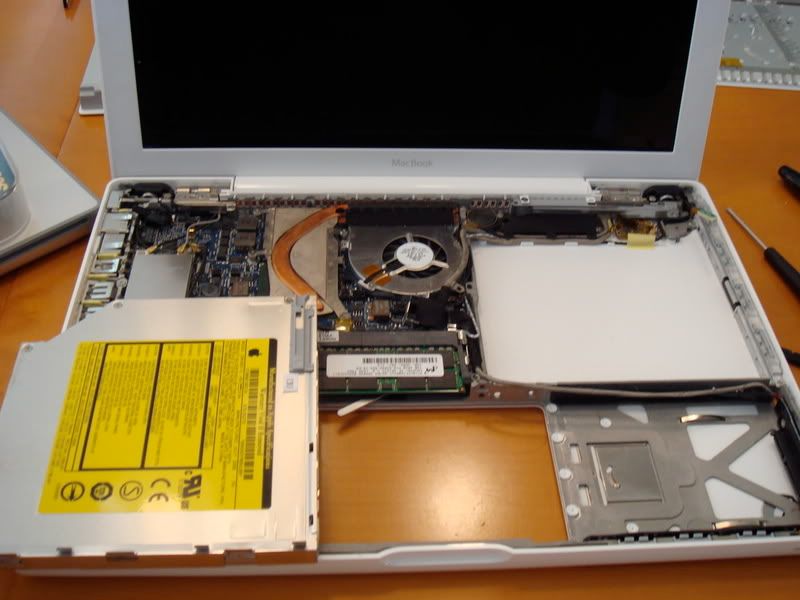
I'm really excited about being able to burn DVD's now too.  Ahh, the simple things in life.
|
|
|
| |
|
|
|
|
|
|
|
Forum Regular
Join Date: Feb 2008
Location: Chicagoland area
Status:
Offline
|
|
Oh yeah, and the flash light was a must as was a pair of small needle nose pliers.
|
|
|
| |
|
|
|
|
|
|
|
|
|
|
|
|
 
|
|
|
Forum Rules
|
|
|
|
You may not post new threads
You may not post replies
You may not post attachments
You may not edit your posts
|
HTML code is Off
|
|
|
|
|
|
|
|
|
|
|
|