|
 |
I want to build a desk.
|
|
|
|
|
Mac Elite
Join Date: Dec 2003
Location: I'll let you know when I get there...
Status:
Offline
|
|
I've been shopping around for a new desk for a while and have a found a few that I like, but the costs have been prohibitive, especially once shipping is added (Hawaiian paradise...).
I've found some designs I like, and I feel confident that I can build something based on these designs, but I'd like some input on the materials to use, especially what materials to finish with.
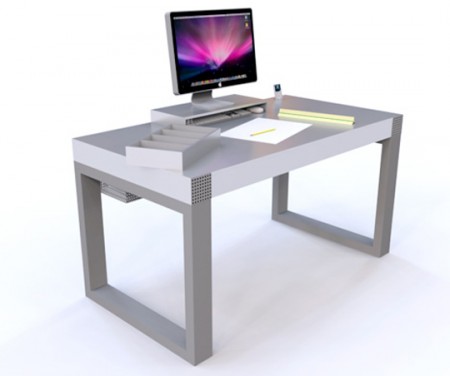
The inspiration:
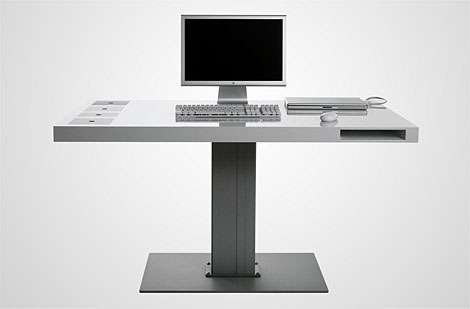 $4000-6000 + shipping.
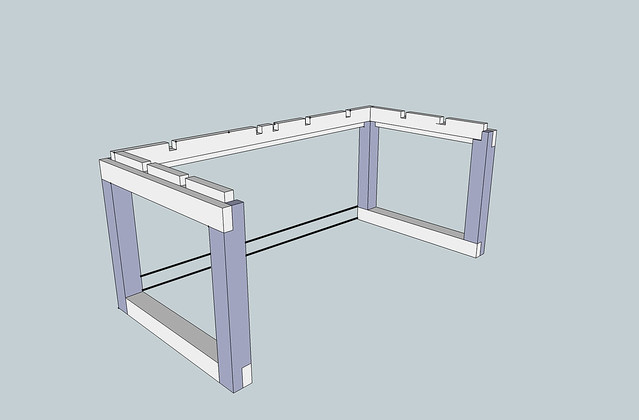
I really like the simplicity of this desk, as well as the functionality. I will be attempting to mimic the desk top portion only, I don't like the stand. I will instead be using legs on each side to hold it up, something like this:
My initial plan for the desk top was to use 6 sheets of MDF and layer them, cutting out portions to create the nook & the channels for wiring, here's a sketchup I did of that design:

My main concern for this design is the weight, an uncut board over 3/4" MDF (4x8') weighs in at about 100lbs. This design calls for 6 sheets, stacked. Even cut down to size, and carved up for the wiring and such, this would probably end up weighing in excess of 300lbs. Seems a bit heavy.
Next idea was to frame the desk with 2x4" lumber, probably on 8-10" centers, leaving room for my cutouts, possibly running PVC or conduit for the wiring. On top of the frame I would put a single sheet of MDF, and a lighter sheet of regular plywood on the bottom. This has the benefit of being a lot lighter, but more complex in terms of construction. I will probably use this method.
The most important part is the finish. I'd like matte black, or possibly a semi gloss black finish for the whole desk. Ideally, it'll look like one solid piece. I'm not sure on the material to use here. I'm thinking formica over the whole thing is probably going to be best, but I'm open to suggestions.
My budget for this is $1000, which will include materials & tool rentals (will probably need a router, which I do not own). Thanks for your thoughts.
|
|
|
| |
|
|
|
|
|
|
|
Addicted to MacNN
Join Date: Nov 2002
Location: Rockville, MD
Status:
Offline
|
|
Don't forget to add a secret compartment inside big enough to take naps in, and a shelf for the alarm clock.
|
|
|
| |
|
|
|
|
|
|
|
Addicted to MacNN
Join Date: Mar 2006
Location: California
Status:
Offline
|
|
^ you watch that show too? I thought I was the only one of my friends that did!
I like your desk ideas boy8cookie. One tip that I can give you is to use screws, and not nails, and to use glue in-between the layers for more stability. Unless constantly having to movie around, you shouldn't worry about the weight, if it's sturdy and supportive, then that's what counts.
|
|
|
| |
|
|
|
|
|
|
|
Addicted to MacNN
Join Date: May 2001
Status:
Offline
|
|
|
|
|
Bush Tax Cuts == Job Killer
June 2001: 132,047,000 employed
June 2003: 129,839,000 employed
2.21 million jobs were LOST after 2 years of Bush Tax Cuts.
|
| |
|
|
|
|
|
|
|
Mac Elite
Join Date: Dec 2003
Location: I'll let you know when I get there...
Status:
Offline
|
|
Originally Posted by hyteckit 
Doesn't match my dimensions, or have the look I want, really. Round legs? Gross.
Thanks for the suggestion though 
|
|
|
| |
|
|
|
|
|
|
|
Addicted to MacNN
Join Date: May 2001
Status:
Offline
|
|
Originally Posted by boy8cookie
Doesn't match my dimensions, or have the look I want, really. Round legs? Gross.
Thanks for the suggestion though
Actually, you can choose different table tops and legs. Table tops range from 54" to 78". Round legs optional.
|
|
Bush Tax Cuts == Job Killer
June 2001: 132,047,000 employed
June 2003: 129,839,000 employed
2.21 million jobs were LOST after 2 years of Bush Tax Cuts.
|
| |
|
|
|
|
|
|
|
Professional Poster
Join Date: Feb 2000
Location: Nashua NH, USA
Status:
Offline
|
|
Your layers don't have space for the legs on the left unless you inset the legs from the edge.
This Old House has an episode on applying formica it didn't look to hard. The trick with the router to trim it flush was genius. I don't think paint / even epoxy will produce a hard enough finish, you'd have to clear coat it and it would still dent if you wrote on it.
|
|
|
| |
|
|
|
|
|
|
|
Professional Poster
Join Date: Jan 2000
Location: Detroit
Status:
Offline
|
|
if you are concerned about weight, use 3/4" rigid foam in the middle layers. use liquid nails to hold all the layers together. since you wanted to veneer everything anyway for a finished look; nobody would know except you what was on the inside.
i would though, reduce your overall mdf/rigid foam dimensions and do case work with a nice finished wood around the 4 sides. a: will stand up to more abuse and b: provide strength to keep it from twisting. do a nice miter at the corners and bam, well built table.
i'd still do it if you went all MDF anyway cause b: is going to happen...it will twist. case work edging all around will keep that form happening.
|
|
|
| |
|
|
|
|
|
|
|
Professional Poster
Join Date: Feb 2000
Location: Nashua NH, USA
Status:
Offline
|
|
Can you get liquid nails to spread evenly without a machine press?
|
|
|
| |
|
|
|
|
|
|
|
Professional Poster
Join Date: Jan 2000
Location: Detroit
Status:
Offline
|
|
Originally Posted by BLAZE_MkIV
Can you get liquid nails to spread evenly without a machine press?
they make cans of the stuff, so you can roll it on, like contact cement (same thing). didn't mean to use the caulk style...thanks for pointing that out.
they also have specific stuff just for rigid foam too; also in a can, to roll on.
|
|
|
| |
|
|
|
|
|
|
|
Mac Elite
Join Date: Dec 2003
Location: I'll let you know when I get there...
Status:
Offline
|
|
Decided to frame it. Here's the sketch:
 for scale, 27" iMac + 27" TB Display
 front/left side - framed w/ plywood
 front/left side - framed no plywood
I decided to build a battery backup in to the desk. In the above picture you can see the space for it. Here's the model I'll be using.
 front/left side - base
If anyone's curious about the design, I can post some different angles.
Today I purchased a chop saw, and the wood to frame it, tomorrow (after the packer's game) I'll be assembling the frame. I'll post some pictures as I progress.
|
|
|
| |
|
|
|
|
|
|
|
Professional Poster
Join Date: Feb 2000
Location: Nashua NH, USA
Status:
Offline
|
|
You need more than just the back piece going from side to side, looks like you could get a second without to much changes, but I'm worried it will bend right in the front. Also put a diagonal inon the right and remove some of the bracing?
|
|
|
| |
|
|
|
|
|
|
|
Mac Elite
Join Date: Dec 2003
Location: I'll let you know when I get there...
Status:
Offline
|
|
Not sure what you mean with the diagonal, perhaps you can illustrate. I am slightly concerned with the bending, but I think the the frame + the 3/4" ply on top and bottom should be enough to support the weight.
|
|
|
| |
|
|
|
|
|
|
|
Posting Junkie
Join Date: Nov 1999
Location: Cape Cod, MA
Status:
Offline
|
|
Stay away from MDF, it's heavy, has terrible purchasing strength and isn't very structurally stable either. Not to mention it'll soak up moisture like a sponge.
Veneer plywood, preferably 7 ply 3/4" is the way to go. Also, I've built a few desks with a solid core oak door as a base.
|
|
|
| |
|
|
|
|
|
|
|
Mac Elite
Join Date: Dec 2003
Location: I'll let you know when I get there...
Status:
Offline
|
|
I'll definitely be using plywood and not MDF now that I'm framing it.
|
|
|
| |
|
|
|
|
|
|
|
Posting Junkie
Join Date: Nov 1999
Location: Cape Cod, MA
Status:
Offline
|
|
Excellent, also, no need for liquid nails with plywood, simple wood glue will bond incredibly strong.
Edit: Also also, if you attatch the rails and posts as shown, that is with a half-lap joint, you shouldn't need any cross-bracing. I'd secure the whole thing together with screws. Get a good counter-sink drill bit and corresponding bung cutter and plug all the screw holes.
|
|
|
| |
|
|
|
|
|
|
|
Professional Poster
Join Date: Feb 2000
Location: Nashua NH, USA
Status:
Offline
|
|
Originally Posted by boy8cookie
Not sure what you mean with the diagonal, perhaps you can illustrate. I am slightly concerned with the bending, but I think the the frame + the 3/4" ply on top and bottom should be enough to support the weight.
A diagonal brace to help prevent it from racking out of square.
|
|
|
| |
|
|
|
|
|
|
|
Mac Elite
Join Date: Dec 2003
Location: I'll let you know when I get there...
Status:
Offline
|
|
Originally Posted by BLAZE_MkIV
A diagonal brace to help prevent it from racking out of square.
Where in the design do you think I need that?
|
|
|
| |
|
|
|
|
|
|
|
Posting Junkie
Join Date: Nov 1999
Location: Cape Cod, MA
Status:
Offline
|
|
Originally Posted by boy8cookie
Where in the design do you think I need that?
The only place I see potential weakness is across the back. Instead of a diagonal brace, add another bottom 'kick board' across the bottom rear and use the same lap joint as the others, should be fine.
|
|
|
| |
|
|
|
|
|
|
|
Mac Elite
Join Date: Dec 2003
Location: I'll let you know when I get there...
Status:
Offline
|
|
Originally Posted by sek929
The only place I see potential weakness is across the back. Instead of a diagonal brace, add another bottom 'kick board' across the bottom rear and use the same lap joint as the others, should be fine.
I'm not gonna pretend to know what you're talking about, you'll need to illustrate.
---
Day 1 update...
New Saw!

The 2x4s cut to size and arranged (somewhat)

One of the legs, notched with a (tiny) skill saw

The left legs, tacked together with screws (no glue yet)

The rear right corner, shows the complexity of the notching, the cross piece is not screwed in yet.

The base!

What the base will look like with the frame on top

The inside of the cross piece, showcasing the notches.

|
|
|
| |
|
|
|
|
|
|
|
Professional Poster
Join Date: Feb 2000
Location: Nashua NH, USA
Status:
Offline
|
|
I though the top was going to be 4" thick not 8.
|
|
|
| |
|
|
|
|
|
|
|
Mac Elite
Join Date: Dec 2003
Location: I'll let you know when I get there...
Status:
Offline
|
|
Originally Posted by BLAZE_MkIV
I though the top was going to be 4" thick not 8.
4.5" actually (2x4 + 2 sheets of 3/4" ply)
The sides and back have an extra lip to them, you can see it in the design.
|
|
|
| |
|
|
|
|
|
|
|
Posting Junkie
Join Date: Nov 1999
Location: Cape Cod, MA
Status:
Offline
|
|
Originally Posted by boy8cookie
I'm not gonna pretend to know what you're talking about, you'll need to illustrate.
Here you go. Just use the same method you are using to secure the left and right posts to eachother at the bottom, but run a longer rail along the rear for added stability.
Originally Posted by boy8cookie
New Saw!
Very nice, I have that exact same saw. You'll need to dial the laser back in after a few years, but otherwise a rock solid saw. There are circle and triangle marks on both of the saw's angle indicators. This allows you to set the saw to a compound angle and cut outside miters (or inside) on crown moulding while holding the stock flat down on the table.
|
|
|
| |
|
|
|
|
|
|
|
Posting Junkie
Join Date: Nov 1999
Location: Cape Cod, MA
Status:
Offline
|
|
Originally Posted by boy8cookie
4.5" actually (2x4 + 2 sheets of 3/4" ply)
That would be 5" total. 3/4" + 3/4" = 1 1/2" added to a 2x4 which is 3 1/2"
Of course 3/4" plywood is more like 11/16", but that's just being picky.
|
|
|
| |
|
|
|
|
|
|
|
Mac Elite
Join Date: Dec 2003
Location: I'll let you know when I get there...
Status:
Offline
|
|
Originally Posted by sek929
[-img-]http://farm7.static.flickr.com/6155/6255248876_23d885ae1b_z.jpg[-/img-]
Here you go. Just use the same method you are using to secure the left and right posts to eachother at the bottom, but run a longer rail along the rear for added stability.
That makes sense, but I hope it won't be necessary. I like the look without it. If I do need it, I'll use a 4x4.
Originally Posted by sek929
Very nice, I have that exact same saw. You'll need to dial the laser back in after a few years, but otherwise a rock solid saw. There are circle and triangle marks on both of the saw's angle indicators. This allows you to set the saw to a compound angle and cut outside miters (or inside) on crown moulding while holding the stock flat down on the table.
I'm probably going to return the saw after I finish, it's angle indicators are slightly off, which annoys me.
Originally Posted by sek929
That would be 5" total. 3/4" + 3/4" = 1 1/2" added to a 2x4 which is 3 1/2"
Of course 3/4" plywood is more like 11/16", but that's just being picky.
You're right, I fail at math.
|
|
|
| |
|
|
|
|
|
|
|
Posting Junkie
Join Date: Nov 1999
Location: Cape Cod, MA
Status:
Offline
|
|
Well any saw will need adjusting right from the factory, including the laser and indicators. On the vertical axis (where the saw itself tips back and forth) it should stop at 45º by itself. If not use an angle finder or protractor and set the saw manually.
I've used alot of miter saws in my day, and that Hitachi is one of my favorites. For real precision work I use a 12" DeWalt sliding compound miter saw. It weighs a ton and is incredibly expensive, but man is it accurate.
Also, real men don't use the fence clamps 
|
|
|
| |
|
|
|
|
|
|
|
Clinically Insane
Join Date: Dec 1999
Status:
Offline
|
|
Real men use 16th century wheel lathes and hand saws.
|
|
"…I contend that we are both atheists. I just believe in one fewer god than
you do. When you understand why you dismiss all the other possible gods,
you will understand why I dismiss yours." - Stephen F. Roberts
|
| |
|
|
|
|
|
|
|
Posting Junkie
Join Date: Nov 1999
Location: Cape Cod, MA
Status:
Offline
|
|
I use hand saws all the time, and I wield a mean chisel.
|
|
|
| |
|
|
|
|
|
|
|
Mac Elite
Join Date: Dec 2003
Location: I'll let you know when I get there...
Status:
Offline
|
|
It's fine, if I completely ignore the angle indicators. The laser doesn't account for blade thickness either, seems pointless. I may end up gifting it to my dad.
|
|
|
| |
|
|
|
|
|
|
|
Professional Poster
Join Date: Feb 2000
Location: Nashua NH, USA
Status:
Offline
|
|
My wood wooing skills are mostly via PBS, but I do feel qualified enough to note that most of the time they measure against the actuall pieces instead of with a tape measure. Or there a jig or stop and they make all the cuts at the same time after testing on scrap.
|
|
|
| |
|
|
|
|
|
|
|
Posting Junkie
Join Date: Nov 1999
Location: Cape Cod, MA
Status:
Offline
|
|
Originally Posted by boy8cookie
It's fine, if I completely ignore the angle indicators. The laser doesn't account for blade thickness either, seems pointless. I may end up gifting it to my dad.
Well, in general, the "cut-off" piece is on the right side of the blade and the piece you want is on the left side. Therefore the laser denotes the leftmost edge of the blade cut, so where you mark your cut is exactly where the blade cuts the piece at if you place the laser right on it.
I set my laser thusly. Cut a 2x4 (or whatever) and keep the wood where it is. Then adjust the laser so that it becomes barely visible on the cut edge of the work. Now, when you line up the laser directly on your cut mark, it will be perfect.
Of course if your keeper piece is on the right of the blade your cut would be about an 1/8" short if you lined up the laser, but being a carpenter for such a long time means I can eye out those incremental measurements with pretty dead-on accuracy.
|
|
|
| |
|
|
|
|
|
|
|
Posting Junkie
Join Date: Nov 1999
Location: Cape Cod, MA
Status:
Offline
|
|
Originally Posted by BLAZE_MkIV
My wood wooing skills are mostly via PBS, but I do feel qualified enough to note that most of the time they measure against the actuall pieces instead of with a tape measure. Or there a jig or stop and they make all the cuts at the same time after testing on scrap.
If you have alot of pieces to cut at the same time, this is certainly the way.
If I have to cut out 200 2x4 studs at a certain measurement I cut one, then clamp it in place. At the butt end of the piece I would then clamp another block against the table. Now all you have to do is bump the end of whatever you are cutting against the clamped block and it will be the same measurement every time.
|
|
|
| |
|
|
|
|
|
|
|
Professional Poster
Join Date: Feb 2000
Location: Nashua NH, USA
Status:
Offline
|
|
How about 4 table legs that need shoulder cuts at exactly the same height. or you can just shave a little of the bottom of the longest leg, oh now is shorter than the others so I'll shave a little off of them...
|
|
|
| |
|
|
|
|
|
|
|
Mac Elite
Join Date: Dec 2003
Location: I'll let you know when I get there...
Status:
Offline
|
|
Quick update...
Worked on the frame, it's 99% done. I haven't attached the plywood to top or bottom yet, I'll do that this weekend. I formica'd the inside of the shelf because I won't be able to do that easily once the ply is on.

The UPS came in today, so I placed that to see how it fit

More pics in the next few days.
|
|
|
| |
|
|
|
|
|
|
|
Professional Poster
Join Date: Jan 2000
Location: Detroit
Status:
Offline
|
|
hope you will have good air movement around the UPS once finished. won't bode well if there isn't.
|
|
|
| |
|
|
|
|
|
|
|
Clinically Insane
Join Date: Dec 1999
Status:
Offline
|
|
Will the top of the table be removable? You'll have to replace those batteries after a few years.
|
|
"…I contend that we are both atheists. I just believe in one fewer god than
you do. When you understand why you dismiss all the other possible gods,
you will understand why I dismiss yours." - Stephen F. Roberts
|
| |
|
|
|
|
|
|
|
Mac Elite
Join Date: Dec 2003
Location: I'll let you know when I get there...
Status:
Offline
|
|
Originally Posted by residentEvil
hope you will have good air movement around the UPS once finished. won't bode well if there isn't.
Though it's not apparent in the design pics I uploaded, I did think of that. The bottom of the desk will have a hole below where the fan is on the back of the unit. I chose this unit because it runs very cool and quietly.
Originally Posted by olePigeon
Will the top of the table be removable? You'll have to replace those batteries after a few years.
The top will not be removable, but the bottom will have a hatch that'll allow access to the back of the unit and I can change the batteries there (same way I will connect cables once the desk is assembled).
|
|
|
| |
|
|
|
|
|
|
|
Professional Poster
Join Date: Feb 2000
Location: Nashua NH, USA
Status:
Offline
|
|
I'd love to see the look of the repair guy when you RMA your desk 'cus the inverter burned out.
|
|
|
| |
|
|
|
|
|
|
|
Mac Elite
Join Date: Dec 2003
Location: I'll let you know when I get there...
Status:
Offline
|
|
Originally Posted by BLAZE_MkIV
I'd love to see the look of the repair guy when you RMA your desk 'cus the inverter burned out.

The whole unit is fully removable with just a few screws out of the bottom.
|
|
|
| |
|
|
|
|
|
|
|
Clinically Insane
Join Date: Dec 1999
Status:
Offline
|
|
Looking good so far. Are you going to sand/paint, or laminate it, or what?
|
|
"…I contend that we are both atheists. I just believe in one fewer god than
you do. When you understand why you dismiss all the other possible gods,
you will understand why I dismiss yours." - Stephen F. Roberts
|
| |
|
|
|
|
|
|
|
Addicted to MacNN
Join Date: Mar 2006
Location: California
Status:
Offline
|
|
Be sure it's not non-water based anything. The possible heat from the components could warm the "covering" up, and make it smell crappy. (trust me)
|
|
|
| |
|
|
|
|
|
|
|
Clinically Insane
Join Date: Dec 1999
Status:
Offline
|
|
Originally Posted by BLAZE_MkIV
My wood wooing skills are mostly via PBS...
Did you try buying the wood a box of chocolates?
|
|
"…I contend that we are both atheists. I just believe in one fewer god than
you do. When you understand why you dismiss all the other possible gods,
you will understand why I dismiss yours." - Stephen F. Roberts
|
| |
|
|
|
|
|
|
|
Mac Elite
Join Date: Dec 2003
Location: I'll let you know when I get there...
Status:
Offline
|
|
Originally Posted by olePigeon
Looking good so far. Are you going to sand/paint, or laminate it, or what?
Laminate (formica) on every visible edge.
Originally Posted by brassplayersrock²
Be sure it's not non-water based anything. The possible heat from the components could warm the "covering" up, and make it smell crappy. (trust me)
Formica is used in kitchen counter tops, so I think I should be alright in this regard.
|
|
|
| |
|
|
|
|
|
|
|
Professional Poster
Join Date: Feb 2000
Location: Nashua NH, USA
Status:
Offline
|
|
Originally Posted by olePigeon
Did you try buying the wood a box of chocolates?
That explains it. All those years wasted.
|
|
|
| |
|
|
|
|
|
|
|
Addicted to MacNN
Join Date: Mar 2006
Location: California
Status:
Offline
|
|
Originally Posted by olePigeon
Did you try buying the wood a box of chocolates?
heh, wood and box in the same sentence. Classic joke!
|
|
|
| |
|
|
|
|
|
|
|
Mac Elite
Join Date: Dec 2003
Location: I'll let you know when I get there...
Status:
Offline
|
|
Some new pictures... been a while, heh. Some sanding and painting left to do, but it's nearly ready for final assembly.

Holes routed out of the top

Formica freshly applied

Sanding needed to straight the edges, but looks decent for a freehand rout.

Shelf and viewport cutout of front
|
|
|
| |
|
|
|
|
|
|
|
Posting Junkie
Join Date: Aug 2003
Location: midwest
Status:
Offline
|
|
I'm impressed, but when it comes to carpentry I measure twice and cut four times. I'd have purchased the lumber for my desk by now if I had started in late October.
|
|
ebuddy
|
| |
|
|
|
|
|
|
|
Mac Elite
Join Date: Dec 2003
Location: I'll let you know when I get there...
Status:
Offline
|
|
|
|
|
|
| |
|
|
|
|
|
|
|
Clinically Insane
Join Date: Dec 1999
Status:
Offline
|
|
Looks really nice. Are you going to paint the inside black?
|
|
"…I contend that we are both atheists. I just believe in one fewer god than
you do. When you understand why you dismiss all the other possible gods,
you will understand why I dismiss yours." - Stephen F. Roberts
|
| |
|
|
|
|
|
|
|
Posting Junkie
Join Date: Aug 2003
Location: midwest
Status:
Offline
|
|
Originally Posted by boy8cookie
Thanks, I think?

|
|
ebuddy
|
| |
|
|
|
|
|
|
|
|
|
|
|
|
 
|
|
|
Forum Rules
|
|
|
|
You may not post new threads
You may not post replies
You may not post attachments
You may not edit your posts
|
HTML code is Off
|
|
|
|
|
|
|
|
|
|
|
|