|
 |
Great b&w photos
|
|
|
|
|
Addicted to MacNN
Join Date: Feb 2008
Location: Standing on the shoulders of giants
Status:
Offline
|
|
This guy, has some great b&w photos. Well great to me anyway.
What I'd like to know, is if its his camera with its lovely full sized sensor (a D700) that enables him to capture such a range of blacks and greys, or is he using some wicked PS/CS filter or trick or I don't know what to get these sorts of pictures.
My b&w photos are OK, but I'd love to get the range that he has.
|
|
|
| |
|
|
|
|
|
|
|
Moderator Emeritus
Join Date: Mar 2004
Location: Copenhagen
Status:
Offline
|
|
That’s highly post-processed. Definition/sharpness has been upped, and it looks like he’s played around quite a bit with vibrancy, contrast, and saturation levels before monochroming the images (and probably played around quite a bit with the different individual colour levels in the monochroming, too).
|
|
|
| |
|
|
|
|
|
|
|
Moderator Emeritus
Join Date: Mar 2004
Location: Copenhagen
Status:
Offline
|
|
To give an example, the following is a photo I took at a concert last week. It’s not very good—or rather, the subject and framing are quite nice, but the colours are completely horrid. This is the original, unprocessed master:

Simply monochroming this photo yields this not very interesting photo:

If you play around with various levels (I’m using Aperture), like vibrancy, contrast, saturation, colour balances, luminance levels, white balance, etc., and then monochrome the photo, however, you can get a much deeper and more evocative photo out of it:

|
|
|
| |
|
|
|
|
|
|
|
Mac Enthusiast
Join Date: Mar 2005
Status:
Offline
|
|
Check out Silver Effects Pro by Nik Software. I kept hearing about it from Scott Bourne and Scott Kelby and have been seriously impressed.
SAm
|
|
|
| |
|
|
|
|
|
|
|
Administrator  Join Date: Mar 2000
Location: Land of the Easily Amused
Status:
Offline
|
|
Ooh, we should all get the same (sharp) raw image from somewhere and see what we can do to it (B&W-wise) and then post back here.
|
|
|
| |
|
|
|
|
|
|
|
Moderator Emeritus
Join Date: Mar 2004
Location: Copenhagen
Status:
Offline
|
|
|
|
|
|
| |
|
|
|
|
|
|
|
Senior User
Join Date: Jan 2006
Location: Naugatuck, CT
Status:
Offline
|
|
I like it too! count me in!
|
|
|
| |
|
|
|
|
|
|
|
Mac Elite
Join Date: Aug 2006
Location: London
Status:
Offline
|
|
Originally Posted by sknapp351 
Check out Silver Effects Pro by Nik Software. I kept hearing about it from Scott Bourne and Scott Kelby and have been seriously impressed.
SAm
Ill second that... they have plugins for aperture and Photoshop!
|
|
MacBook Pro 2.2 i7 | 4GB | 128GB SSD ~ 500GB+2TB Externals ~ iPhone 4 32GB
Canon 5DII | EF 24-105mm IS USM | EF 100-400mm L IS USM | 50mm 1.8mkII
iMac | Mac Mini | 42" Panasonic LED HDTV | PS3
|
| |
|
|
|
|
|
|
|
Administrator Join Date: Mar 2000
Location: Land of the Easily Amused
Status:
Offline
|
|
Alright, the game is afoot!
Here is the 11MB RAW CR2 file.
This is what it looks like, untouched:

All that I've done to it is convert it from RAW-->JPG using Aperture. No adjustments.
So, let's see some B&W fun. 
Oh, and be sure to mention what steps you took to get the desired result. Aperture/Lightroom settings, Photoshop tweeks/filters, etc.
|
|
|
| |
|
|
|
|
|
|
|
Moderator  Join Date: Jun 2000
Location: inside 128, north of 90
Status:
Offline
|
|
Fun!

Photoshop>Adjustments>Black&White>Maximum White preset with a slight tint. Then some extreme levels, and 3% noise to give it a little film feel. After adding noise, it seemed too dark again so a little curves. Utilizing restraint, I backed away from the cross-hatch filter and called it good. I liked how ethereal/elven she ended up. 
|
|
|
| |
|
|
|
|
|
|
|
Moderator  Join Date: May 2001
Location: Hilbert space
Status:
Offline
|
|
Wow, great bw conversion, andi*pandi! :wow:
Do you have a full-res version? I'd like to see how well film grain is emulated.
|
|
I don't suffer from insanity, I enjoy every minute of it.
|
| |
|
|
|
|
|
|
|
Addicted to MacNN
Join Date: Feb 2008
Location: Standing on the shoulders of giants
Status:
Offline
|
|
My attempt

If you want larger, change the last M in the URL to XL or X2.
And a screen capture of what I did in Aperture : sharpening, edges and definition all the way up. Adjustments Black & White, slight modifcation in Curves.

How about a landscape to play with?
Silver Efx Pro looks good, but 200€ for a B&W only photo editing tool - DAMN !!!
(
Last edited by mattyb; Oct 23, 2010 at 08:09 AM.
)
|
|
|
| |
|
|
|
|
|
|
|
Addicted to MacNN
Join Date: Feb 2008
Location: Standing on the shoulders of giants
Status:
Offline
|
|
Trying to figure out how to change that blue eye paint into white within Aperture like andi*pandi did in PS. What exactly was done?
|
|
|
| |
|
|
|
|
|
|
|
Moderator Join Date: Jun 2000
Location: inside 128, north of 90
Status:
Offline
|
|
Thanks Oreo! I used the jpg instead of the raw, but it will be a good experiment to see if I can replicate the effects.
Matty, it was the Maximum white filter that did that, kind of a negative effect.
|
|
|
| |
|
|
|
|
|
|
|
Administrator Join Date: Mar 2000
Location: Land of the Easily Amused
Status:
Offline
|
|
I like the almost infrared quality to the conversion Andi.
Matty, I'll play around with that landscape a bit later. Were you trying for the hyper-realism in the photos you linked? I've found that overuse of the Definition feature in Aperture produces rather unreal photos. I think, to get what you wanted, we'd have to start with something where the entirety of the face was perfectly sharp. And my photo was narrowly focused (so not even both eyes are perfectly in focus).
Ok, here's a few attempts:

This was just straight up Aperture.
Exposure 0.36 Blackpoint 10.08 Contrast 0.03 Definition 0.1 Saturation 1.08 Vibrancy 0.28 Highlights 20.63 B&W 78%(red) 28%(green) 15%(blue) Sharpen 0.5 Radius 1.0
It's a simple red-heavy b&w job. Clears up the skin a bit, blows out the hair highlights even more.

This and the rest are all down with Alien Skin's Exposure 3 plug-ins. I have made a lot of custom filters presets recently and I was trying out a few of my b&w-centric ones. This I call "Subtle Red". Much darker. You'll notice that about the only thing that remains the same is the blue eye paint over her eyes. I feel this one adds a bit of character (along with a bit of grain). It wouldn't be my first choice for a closeup though.

This one I call "Classy People". I chose it because I like how it completely blackens the blue above her eyes. And the slight softening (blur) works well with her expression.

This one is "Dreamy 60s Farrah" (I just made it for this image). It was inspired by Andi's version above. I'm a sucker for yellows & browns. Mixing that, with some grain, a bit of contrast, and you get a sort of sunny-day flowerchild throwback. I think this one will be useful in future festival shots.
Oh, and here are some 100% crops in case you want to see what they really look like up close. Let me know if you want me to elaborate on any of the filter settings.


|
|
|
| |
|
|
|
|
|
|
|
Moderator Join Date: May 2001
Location: Hilbert space
Status:
Offline
|
|
How did you manage to obtain the film grain-like look in the last pic?
|
|
I don't suffer from insanity, I enjoy every minute of it.
|
| |
|
|
|
|
|
|
|
Senior User
Join Date: Jan 2006
Location: Naugatuck, CT
Status:
Offline
|
|
ENHANCE!! (This is how CSI catches bad guys.  )
Originally Posted by Demonhood
|
|
|
| |
|
|
|
|
|
|
|
Administrator Join Date: Mar 2000
Location: Land of the Easily Amused
Status:
Offline
|
|
Originally Posted by OreoCookie
How did you manage to obtain the film grain-like look in the last pic?
The Exposure plug-in has some nice controls for mimicking film grain. Here were the settings I used for the last shot:

Being able to control the strength and "roughness" of the grain is great. Goes a long way to bringing back that real film feel.
|
|
|
| |
|
|
|
|
|
|
|
Moderator Join Date: May 2001
Location: Hilbert space
Status:
Offline
|
|
That's a Photoshop plugin I presume?
|
|
I don't suffer from insanity, I enjoy every minute of it.
|
| |
|
|
|
|
|
|
|
Administrator Join Date: Mar 2000
Location: Land of the Easily Amused
Status:
Offline
|
|
That is correct. It is also, it appears, compatible with Lightroom now too. No Aperture plugin yet, sadly.
|
|
|
| |
|
|
|
|
|
|
|
Moderator Join Date: Aug 2001
Location: Nobletucky
Status:
Offline
|
|
|
|
|
|
| |
|
|
|
|
|
|
|
Moderator Emeritus
Join Date: Mar 2004
Location: Copenhagen
Status:
Offline
|
|
Originally Posted by Thorzdad
I knew there was a good reason I didn’t have it.
|
|
|
| |
|
|
|
|
|
|
|
Administrator Join Date: Mar 2000
Location: Land of the Easily Amused
Status:
Offline
|
|
Yeah, I can't really recommend people buy the plug-in set unless you make a healthy profit off your images or your tax refund works out to exactly $250+ tax.
If it was priced at $100, it would sell like hotcakes.
Anyway, more b&w photos!
|
|
|
| |
|
|
|
|
|
|
|
Addicted to MacNN
Join Date: Feb 2008
Location: Standing on the shoulders of giants
Status:
Offline
|
|
OK just got Photomatix 4 working. I've played around with HDR before but it never really appealed because I shoot my kids so much (I think that HDRed people look terrible). However I was playing around with their settings and the b&w one really gives me the range that I was after.
So a 'false' HDR, one picture with exposure settings varied (+0.7, +0.3, 0, -0.3, -0.7 EV) into Photomatix, used the "Enhancer - B&W" setting from the Preset Thumbnails window. Saved as jpeg then into Aperture and boosted the Definition setting all the way up.

|
|
|
| |
|
|
|
|
|
|
|
Moderator Emeritus
Join Date: Mar 2004
Location: Copenhagen
Status:
Offline
|
|
That’s still quite a bit too much HDR for my taste, and if RR and Jawbone see that photo, you might have to start checking your tea or coffee for extra bitter tastes. 
Actually, though, I was thinking about this thread last night as I was processing and uploading more pictures from Iceland Airwaves. I had a picture that in its original form is sort of all right, but nothing special—after processing (quite heavily) and B/W’ing it, though, it was a really great concert portrait (view it large, the effect is much better):
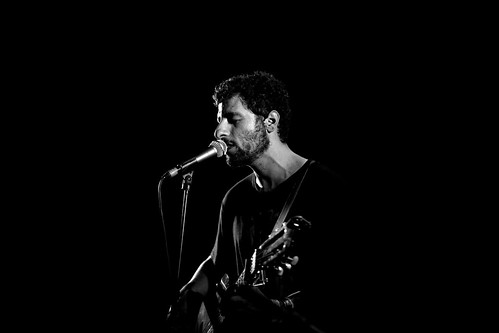
See how much processing can be hid behind B/W’ing an image? I hid an entire mixing desk and two people from mine.
|
|
|
| |
|
|
|
|
|
|
|
Addicted to MacNN
Join Date: Feb 2008
Location: Standing on the shoulders of giants
Status:
Offline
|
|
Thats a great shot Oisín. Reminds me of the low-key stuf that I did.
|
|
|
| |
|
|
|
|
|
|
|
Addicted to MacNN
Join Date: Feb 2008
Location: Standing on the shoulders of giants
Status:
Offline
|
|
Since nobody else is bothering, another false HDR to b&w from me.

|
|
|
| |
|
|
|
|
|
|
|
Administrator Join Date: Mar 2000
Location: Land of the Easily Amused
Status:
Offline
|
|
Originally Posted by mattyb
I actually kind of like the surreal hyper-contrast nature of this shot. Altho it could be straightened out a few degrees.
Originally Posted by Oisín
See how much processing can be hid behind B/W’ing an image? I hid an entire mixing desk and two people from mine.
Ha. Editing out everything is definitely the right choice. The isolation really works (as does the b&w). It's a bit centered, but the only way it would work better would be if he were looking to the upper left portion of the frame.
Originally Posted by mattyb
See, here I can't tell if I'm creeped out by the unreal nature of HDR or it's just those damned fish staring at me.
|
|
|
| |
|
|
|
|
|
|
|
Baninated
Join Date: Nov 2010
Status:
Offline
|
|
Wow great editing job! Yeah there's so much you
can do with black and white. There's so much that
can be done. Even with just the windows photo editor.
Since contrast and brightness settings do a lot to a photo.
|
|
|
| |
|
|
|
|
|
|
|
Mac Elite
Join Date: Nov 2006
Location: here
Status:
Offline
|
|
I like to work with the black & white adjustment layer in Photoshop, supported by Channel blending.
Calculations is also a great menu to achieve rich blacks.
|
|
|
| |
|
|
|
|
|
|
|
|
|
|
|
|
 
|
|
|
Forum Rules
|
|
|
|
You may not post new threads
You may not post replies
You may not post attachments
You may not edit your posts
|
HTML code is Off
|
|
|
|
|
|
|
|
|
|
|
|